Garlic, sometimes known as the “stinking rose,” is a versatile and flavorful vegetable that adds depth to countless dishes. It adds something special to foods from around the world and can make many dishes taste better.
In this guide, we’ll explore the art of growing garlic in your garden, from selecting the right varieties to harvesting your homegrown cloves.
Understanding Garlic
Garlic, scientifically known as Allium sativum, belongs to the same family as onions, leeks, and shallots. This pungent bulb is perhaps best known for its strong aroma and rose-like bulb shape. Garlic has been cultivated for centuries and is cherished worldwide for its culinary and medicinal properties.
Choosing the Right Garlic Variety
The first step on your garlic-growing journey is selecting the right garlic variety. Two primary types of garlic dominate the market: hardneck and softneck.
Hardneck varieties include ‘Rocambole’ and ‘Porcelain.’ They are known for their bold flavors and are favored by culinary enthusiasts.
Softneck garlic, like ‘Silverskin’ and ‘Artichoke,’ are milder in taste and boast a longer shelf life. Choose the variety that best suits your culinary preferences.
When To Plant Garlic
Planting garlic at the right time is crucial to ensure a successful harvest of flavorful bulbs. Garlic is typically grown in the fall, allowing it to overwinter and develop into robust bulbs. Here are the key steps to planting garlic:
Season
The best time to plant garlic is in the late fall, typically around October. This allows it to establish roots before winter and resume growth in the spring. In regions with milder winters, you can plant garlic in late winter or early spring as well.
Climate
Garlic is a cold-season crop, so it thrives in areas with cold winters and moderate summers. It requires a period of vernalization (exposure to cold temperatures) to stimulate bulb formation.
Soil Temperature
Ensure that the soil temperature is around 50°F (10°C) or cooler. Garlic cloves need this cold period to break dormancy and initiate growth.
Remember that garlic planted in the fall won’t produce significant top growth before winter sets in. The cloves will remain dormant until the temperatures warm up in the spring, at which point they will begin to grow vigorously.
Preparing the Soil
Garlic thrives in well-drained, loamy soil rich in organic matter. Before planting, ensure your garden bed is free from rocks and debris. Consider conducting a soil test to assess nutrient levels. The optimal pH range for garlic is between 6.0 and 7.0. You can adjust the pH by adding lime to raise it or sulfur to lower it.
Compost can help improve the soil’s fertility and structure, too. It can be a good substitute for commercial fertilizers.
Planting Garlic Cloves
Garlic is typically grown from individual cloves, each of which will produce a new bulb. To plant garlic, break apart the bulb into individual cloves, leaving the papery skin intact. Plant the cloves pointed side up, about 2 inches deep and 4-6 inches apart, in rows spaced 12-18 inches apart. Ensure that the cloves are firmly planted in the soil, with the tip just below the surface.
Sunlight and Location
Garlic requires full sunlight to thrive. Choose a garden spot that receives at least 6-8 hours of direct sunlight each day. Proper sun exposure is crucial for healthy growth and the development of large bulbs.
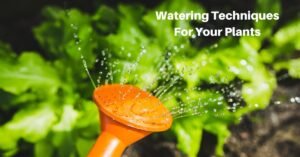
Watering and Mulching
Consistent moisture is crucial for garlic. Keep the soil evenly moist, but avoid overdoing it. Water your garlic plants regularly, especially during dry spells.
To help retain moisture and suppress weeds, apply a layer of organic mulch, such as straw or compost, around the garlic bed.
Fertilizing Garlic
Garlic is a relatively low-maintenance crop when it comes to fertilization. Before planting, work a balanced, slow-release fertilizer into the soil based on your soil test. Your compost treatment may make this unnecessary, so test before and after adding compost.
Garlic doesn’t require heavy feeding during its growing season, but you can apply a light fertilizer or side-dress with compost when the leaves begin to grow.
Scaping Garlic
Garlic plants will produce flower stalks called “scapes” in late spring or early summer. Remove these to redirect the plant’s energy from flowering to bulb development. Snip off the scapes just above the leaves with scissors or pruning shears. Use scissors or pruning shears. Scapes are edible and can be used in various dishes, or even grilled alone.
Pest and Disease Management
Garlic is relatively pest- and disease-resistant. However, watch your plants for common issues like aphids and white rot. If pests or diseases become problematic, consider using organic pest control methods.
Harvesting Garlic
Knowing when to harvest garlic is essential for achieving the best flavor and storage quality. Garlic is typically ready for harvest in late spring or early summer, approximately 8-10 months after planting. Here’s how to tell when your garlic is ready:
Leaves
As the garlic matures, the leaves will begin to turn yellow and die back. When about half of the leaves have dried up, it’s time to start monitoring your garlic closely.
Test Bulbs
To check if your garlic is ready, carefully dig up one bulb to inspect its size and condition. The cloves should be plump and well-formed, filling the bulb completely.
Variety Matters
Different garlic varieties mature at different rates, so it’s essential to consider your specific variety’s growth cycle.
Once you’ve determined that your garlic is ready for harvest, loosen the soil around the bulbs with a garden fork or trowel. Gently lift the bulbs out of the ground, being careful not to damage them. Brush off excess soil and leave the bulbs attached to the stems.
Curing and Storing Garlic
After harvesting, garlic needs to cure for a few weeks to develop its full flavor and improve storage life. Here’s how to cure and store garlic:
- Bundle: Tie 6-8 garlic plants together at the stems using twine or string. Leave the roots and leaves attached.
- Hang: Hang the bundles in a dry, well-ventilated area, such as a garage or covered porch. Ensure good airflow to prevent mold.
- Cure: Let the garlic cure for 2-3 weeks until the stems and outer skins are completely dry. The cloves will become plump, and the papery skins will be tight.
- Trim: After curing, trim the roots and cut the stems down to about an inch above the bulb.
- Store: Store your cured garlic bulbs in a cool, dry place with good ventilation. A mesh bag or a basket with holes works well to provide air circulation. Properly stored garlic can last several months.
Growing garlic in your garden is a gratifying experience that rewards you with fresh, flavorful bulbs for cooking. Growing it is a slow process, but well worth the wait! So, embark on this flavorful journey, nurture your garlic plants, and savor the fruits of your labor in the kitchen!