We all know the story of the formation of the Grand Canyon. Over six million years, this enormous canyon was carved into the rock by the forces of nature. It shows the power of the elements and what Mother Nature can do to even the toughest surfaces.
That same thing can happen to your concrete patio, sidewalk, or driveway if they aren’t cared for. And it will happen much more quickly since concrete is a different material and also will endure other stresses. But by sealing your concrete, you can make sure it will last. It likely won’t hold up for six million years – but it’ll be good for several decades.
Why Does Concrete Have To Be Sealed
Concrete is a pretty solid surface, as you learned if you learned to rollerskate in your driveway. But it’s not as solid as you might think. It’s actually quite porous.
That means that concrete can and will allow water to penetrate it. Of course, it’s not as porous as a sponge or even soil. But if you pour water on unsealed concrete, you’ll see it soak in. It doesn’t run off; instead, it seeps into and penetrates even the highest-quality concrete.
By itself, this can slowly cause the concrete to break down. Coupled with freezing temperatures, it will lead to flaking and even cracks. Water expands when it freezes by as much as 9%, so once it’s inside your concrete and freezes there, it will start doing its damage.
Besides water from rain or other sources, other chemicals can end up on your concrete as well. Oil or antifreeze may drip from your car onto the driveway. Grease from your barbecue grill may splash on the patio. You may drop a bottle of milk or soda as you go up the front path. These can also cause damage.
Of course, there is also pollution in rainwater. The level of contaminants varies from place to place and even from storm to storm. But the other chemicals that are carried in the rain can also be destructive.
Sealing the concrete provides a non-porous layer that will keep water and other chemicals from penetrating the surface. It helps them bead and roll off without getting into the concrete. That means the damage they can do is reduced or even eliminated.
Of course, the sealant also gives your concrete a finished look. While its primary purpose is functional, the aesthetic value is great as well!
Concrete is great for driveways. But what other driveway material choices do you have?
How Often Should Concrete Be Sealed
Of course, the sealant you use on your concrete isn’t permanent. Eventually, it will start to wear off and need to be replaced. However, it’s much easier (and cheaper!) to apply a new coat of sealant than to have to tear up and replace an entire concrete bed.
Under normal circumstances, concrete should be resealed every two to three years. If there is a high level of traffic, strong sunlight for extended periods, or flooding or constant rainfall, you may need to do it annually. The same holds true if there are large spills that are not immediately cleaned up.
If you notice that water is turning your concrete dark, that means the water is permeating the concrete in that spot. In other words, the sealant has worn off. That’s a definite sign that it’s time to reseal. Odds are that if one small area is affected, the whole thing isn’t faring much better, so it’s best to reseal the entire surface at the same time.
We should also mention that if it’s a new concrete installation, you should wait at least 30 days before applying the sealant. This will allow the concrete to completely cure. Otherwise, the sealant won’t adhere properly to the surface.
Tools And Supplies Needed For Sealing Concrete
Resealing your concrete isn’t too difficult, and doesn’t require a lot of tools. You’ll simply need to clean the surface then apply the sealant.
For cleaning, you should have ready:
- Broom
- Deck brush
- Pressure washer
- Alkaline degreaser for tougher stains
- Concrete cleaner
- Concrete etcher (if recommended by sealant manufacturer)
For applying the new sealant, be sure to purchase:
- Concrete sealant
- Paint roller or sprayer
- Paint pan, if you’ll be using a roller
If you’re changing brands of sealant or the old layer was thick, you may want to remove the old sealant first. This is a more complicated process and you have to know what type of sealant was used. It might be better to hire a professional in this case. If not, be sure to investigate carefully how to strip the old sealant.
Steps to Seal Your Concrete
Weather is an important factor for applying a fresh coat of sealant to your concrete. You’ll need to have three straight dry days with a temperature above 50°F. That means it should stay above 50°, even at night!
Once you find the right weather, your next step is to prepare the surface. Prepping your concrete is essential to making the resealing worthwhile. Without proper preparation, the new sealant will end up trapping dirt and stains underneath. It will also lead to it peeling and flaking quickly.
Sweep the surface off then use the pressure washer to remove any remaining dust and dirt and to get into any areas the broom couldn’t reach. If you don’t have a pressure washer, you can hose it down but be sure to be thorough.
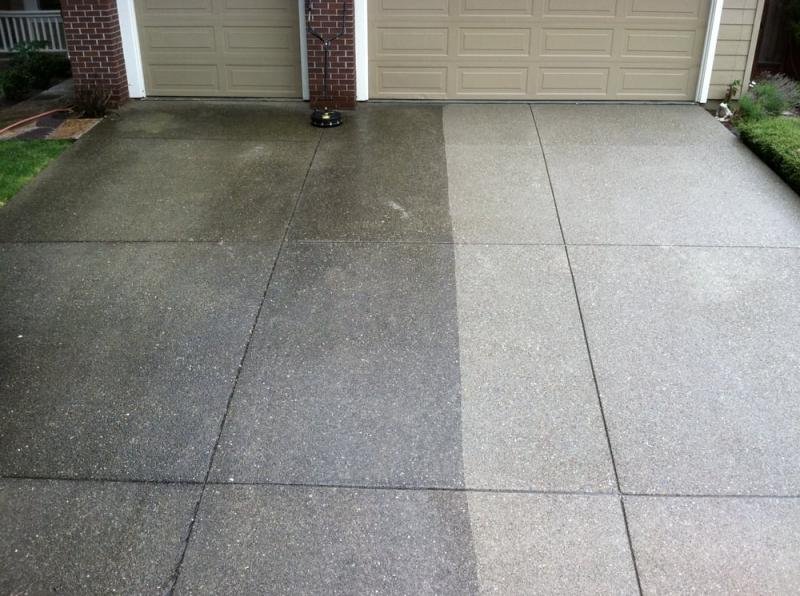
If there are any stains or marks on the surface, scrub them up. A mild detergent is fine to use but be sure to rinse it off completely. You can move up to an alkaline degreaser if that doesn’t work. As a rule of thumb, though, always start with the mildest possibility first. Only use harsher chemicals if necessary. The same is true for scrubbing. Only move to a scrubbing tool if your broom or pressure washer aren’t getting the job done.
Using a quality concrete cleaner can help provide the same effect, but you may not need it except for tough grease stains.
Once your surface is clean, you’ll also need to let it dry completely. Some brands of sealant recommend that you etch the surface; be sure to follow the instructions on the etching product and use safety equipment.
When you’re ready to apply the sealant, first stir it well with a paint stirrer. But avoid shaking it since that could lead to air bubbles which would later be transferred to the surface of your concrete.
Fill your sprayer with sealant and apply it slowly and smoothly. Try not to get distracted or focus on one spot because this will lead to an irregular finish. If you use a roller to apply your sealant, again use long, slow strokes to cover every inch. When you wet the roller again, overlap the last section a bit to cover up any places where the thinner became too thin. This will also help blend the strokes so there won’t be an obvious start-and-stop look.
Most outdoor concrete will also have expansion lines. These allow the concrete to shift slightly or expand from heat without cracking. But it’s also important that your sealant gets into these gaps. That will likely happen without an issue if you use a sprayer. However, if you use a roller, you may want to go back and coat these spaces. Allow your sealant to dry completely, then use a paintbrush to fill these lines. Again, be careful not to create pools that will cause an irregular appearance.
Avoid using your concrete area until the whole surface has thoroughly dried. That means no parking, driving, walking, or placing furniture on it. After 24 hours, the surface can return to regular use.
Keeping Your Concrete Seal Strong
Once your seal is applied, it should hold up for a couple of years at least. However, it’s still important to care for it to keep it intact.
You can use a regular kitchen broom to sweep it off. A hose or pressure washer on occasion will help with dust and dirt the broom misses.
Mild detergent – even dish detergent – will help get rid of marks or stains. As we mentioned above, always try to use the least powerful cleaner possible. Water first, then a mild detergent. Only when necessary should you try something stronger. Many sealants will also provide recommendations about what to use.
If you do notice oil, gasoline, antifreeze, or other spills on your concrete, clean them up as soon as possible and dispose of the rags in an environmentally-friendly manner. Allowing spills to stand will give them more time to eat through the sealant and damage the concrete.
As we already noted, be on the lookout for any time that the concrete seems to be absorbing water. It will become discolored and turn dark. That means the sealant is no longer doing its job. It could be one spot that’s affected or possibly the whole job is starting to wear out. In either case, to get a consistent look to your concrete, it’s best to reseal the whole piece.
Finally, don’t drag objects with sharp edges across the concrete. That can mean everything from heavy equipment to a garden rake. The edge can tear through the sealant. It might even damage the concrete itself. Where possible, carry instead of drag. Or use some kind of padding under the item you have to move across your concrete.
Conclusion
Nature can damage concrete, but a properly-sealed surface will hold up much longer and retain its great appearance. The job isn’t too difficult as a DIY project. It’s definitely worth keeping on top of it so that your patio or driveway will stay in good shape for the entire time you stay in your home!